Sunday, March 31, 2013

The Archmount

Over a year ago, My good friend Steve from The Scooter Scoop, told me about his idea for a unique, simple, pocket-able iPad tripod mount, and since we're both VERY interested in product design, we got together to see if we could make something of his idea.

The Archmount was born


So I set to work fleshing-out the design using Solidworks.
Initially I concentrated only only producing a "Proof of Concept" design, one that had all the functional geometry and basic constraints we'd be using. Here is that first design in CAD and a 3D printed model:


About this time, we became friends with Aaron, A Professor at UTA that became our defacto project manager and all-around helpful guy.

Well, the proof-of-concept model worked great, but we still had a lot to figure out, mainly how to manufacture this product in quantity? Good old fashioned injection-molding seemed to be the way since few would be willing to buy a $300 3D printed product, So the iterative process started, RevA, RevB, RevC..
Of course, prototyping and testing at each level and learning more about injection mold design than I ever thought possible, ultimately settling on a simple-to-mold design that had no "side-actions" or complicated geometry that tends to increase the cost of mold tooling. 
We really "went to school" on the process of bringing a product to the market, The Archmount pushed our skills further and further each step, CAD, Marketing, Project Management, Sourcing, Cost Analysis, you name it, we pushed ourselves.
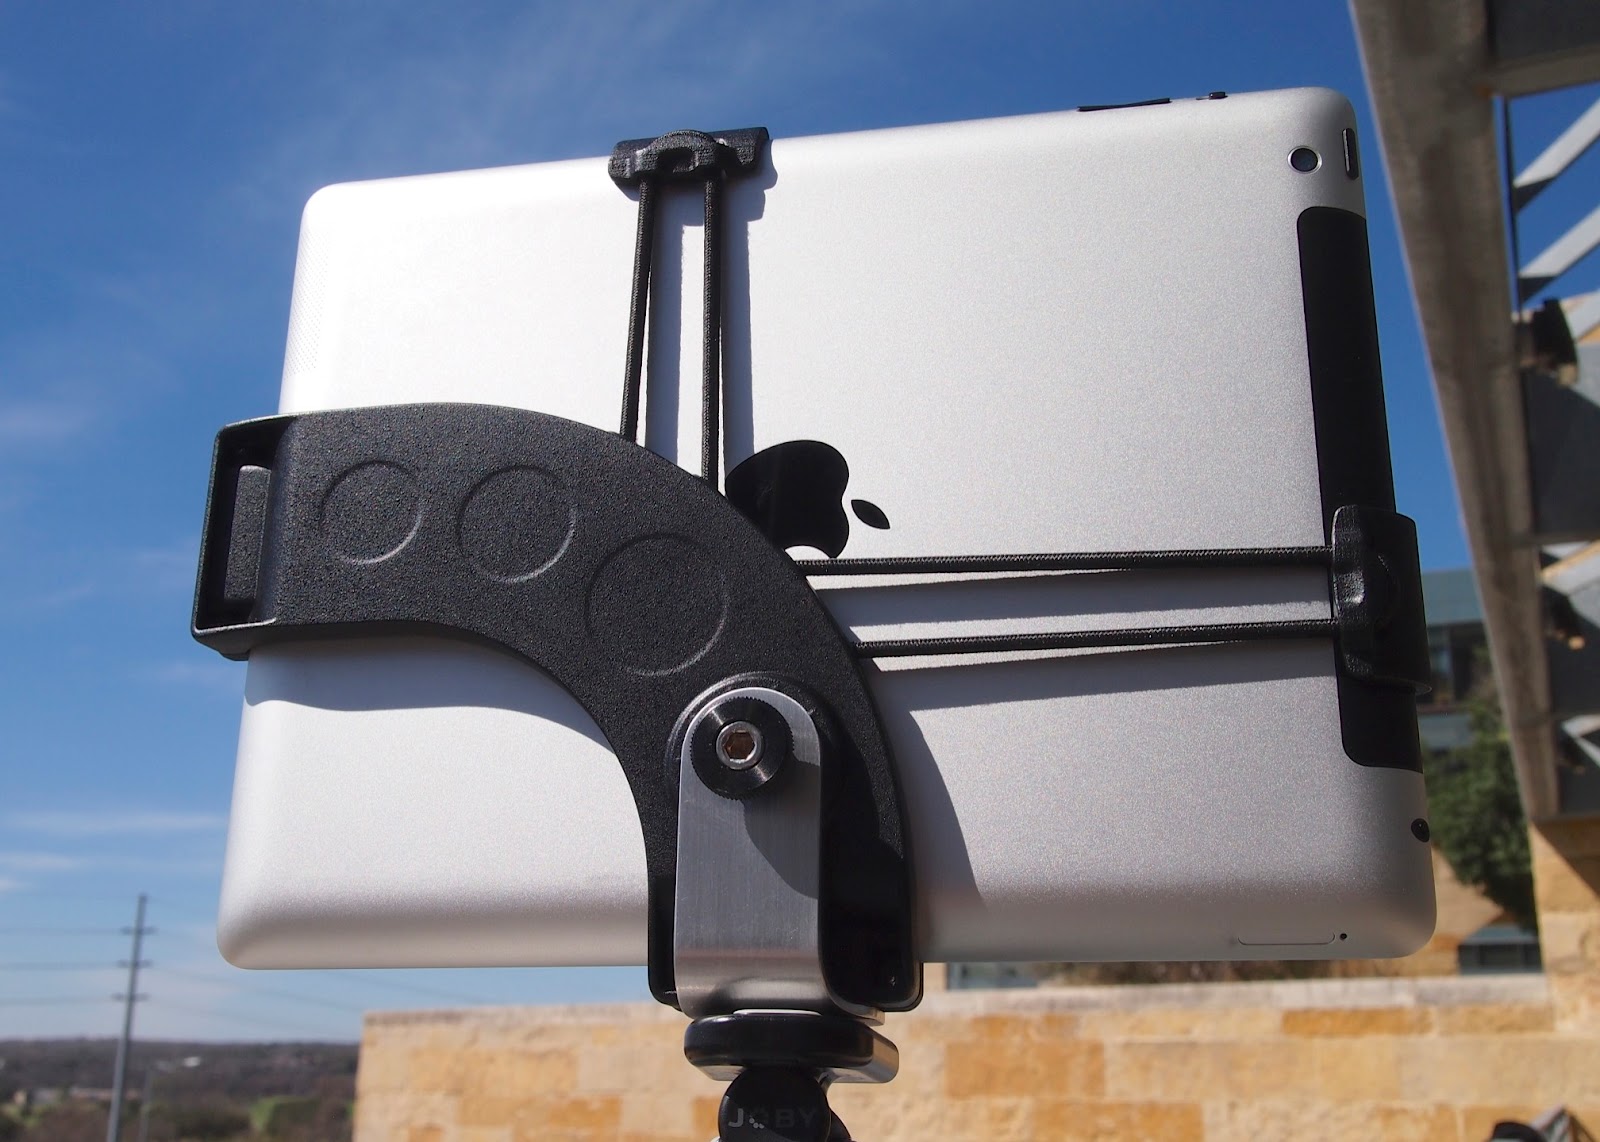
Here is the final result:


We really felt like we had a great product, but reality set in.
The reality is that contracting for injection molding is serious $$, not to mention that the market for iPad mounts is already very crowded. We certainly didn't have the tens of thousands of dollars needed to produce and market the Archmount and getting a loan for that is next to impossible so we turned to Kickstarter.


Turns out we didn't reach our funding goal, but I don't think that's necessarily a bad thing, It showed us this product would sell in lower numbers than we originally thought, at least with our marketing budget of essentially zip. Also, we needed a pretty large sum of money to tool-up, produce, assemble, package and ship about 1000 units and we had almost no "bootstrap" money to supplement that.
In hind-sight I think we could have produced and sold a couple thousand of these if we had tried a different strategy and were more timely in our campaign but the clock has pretty much run out on this on.
All-in all, working on this project was a real joy and we got so much out of it despite not going into production, we honed our skills immensely, pushed ourselves to learn skills that we'd otherwise wouldn't have and met so many helpful and encouraging people along the way.
I'd call it a "Partial Success".


Damascus Steel Bracelet

I was recently asked if I was willing to make a graduation gift for some close friends as a gift for their nephew. Specifically a monogrammed bracelet. I had free reign on design but a specific budget.

No Problem!


I wound up using two styles of Stainless Damascus Steel, 14ga 18kt gold wire and gold plated machine screws. I think it was one of the most interesting jobs I've done, quite a test of techniques!


Here is what I started with, Stainless Damascus Steel drops given to me from my super-talented friend Chris from Speed Shop Design:


I didn't take many pictures while making this piece unfortunately, but it would've just been images of me scratching my head 90% of the time, trying to figure out how to do what I wanted to do...
Eventually I settled on a combination of machining and cold-working the three separate parts before engraving the letters, setting the gold, followed by an acid etching and gentle localized heating to give it some color and contrast. I wouldn't mind making one for myself now!


iPhone4 Case Experiment

Having bought an iPhone4 some time ago, I've considered buying a case many time, but I never was very happy with what was out there. So I set about working on one that expressed my function and aesthetic.


I really like the "plate and screws" approach, something that emphasizes materials used and high-lights fancy fasteners, It's just my preference!
The design essentially uses a top and bottom plate, each 1/16" thick with an inner lining of 1/32" epdm rubber, held together with 4 corner pieces made from 3D printed material, all parts are held together with very small, gold-plated 1-64 torx machine screws.
I experimented with different materials for the plates, Aluminum, Brass, Copper-plated FR4, G-10 and even Carbon Fiber plate.


Cutting the plates on the CNC super-easy.

In the end though, I abandoned the use of these cases in favor of a naked iPhone. 
Seems just about any material that covers the iPhone effects the signal strength and renders the iPhone damn near unusable. It's an uphill battle with the iPhone just starting off too, Heck, just holding it wrong can kill an already spotty signal. The only materials that could be used seem to be non-metals and furthermore, nothing with any kind of carbon or metal additive. G-10 and Micarta were the only materials I tested that might be OK..but still cut the signal, just not as drastically as metals. 
It was a shame too, since my favorite was the carbon fiber plate and gold screws with clear 3D printed corners and buttons.. Looked like super-high-end Gucci stuff! but almost no signal! Ugh.
Of course Apple's case design recommendations spell this out but I'd seen some solid metal cases being sold(EXOVault)  so I took a chance.
Interestingly, EXOVault seems to have gone from designing bricks of metal type cases to designs that use only a very minimal amount of metal.. Also non-carbon composites and wood.. So maybe I'll give it another shot soon using what I've learned.


Engagement Ring Prototyping!

So a little over a year ago, my good friend Chris from Speed Shop Design asked me to prototype an engagement ring set he'd designed for his soon-to-be-wife. What an Honor!

I was put to work machining the set from 2024 aluminum to check for correct size, comfort, aesthetics and also as a practice piece for gem-setting. This was a very important step since the real ring set was to be cast from platinum.

After looking at the ring design for a while, I choose a simple machining method, the bridge...


In essence, a series of small "bridges" that connect the part geometry to the out portion of the material, then after the machining is complete, the part is removed from the block using a small coping saw.
Since both top and bottom of the ring design is symmetric, I only had to write one program and use it for both sides.
The set-up:

The first side:

The second side:

After finishing the machining, I sent the raw parts to Chris for finishing and practice setting using a CZ, turns out his design was spot-on.


Everyone was happy with the design and fit so off it went to be investment cast in platinum and hand set with a diamond.
Operation Engagement Ring: A Complete Success! 

Monday, October 24, 2011

Operation Light Tent

I decided this weekend I needed to get a bit more serious when it comes to taking pictures of projects, and looking around it seems that decent macro pictures require better lighting, aka.. A Light Tent. So I threw one together and without even trying very hard, got some decent pics.


Wish I'd done this sooner as it was pretty easy and a great return on the investment, some 1/2" PVC, a few fittings, some white stiff cloth and some shop lights are really all it took.. I still need to play around with different full-spectrum "daylight" bulbs, but I'm 90% there already.

It's clear that this sort of photography requires LOTS of light and 3-75watt bulbs aren't quite enough, but that's easy to fix and with a digital SLR camera, software and a bit of patience, I should be able to get 100% better photographs!

OPERATION LIGHT TENT: SUCCESS

Tuesday, September 20, 2011

Custom Wedding Rings

My wife and I aren't wealthy, shoot not even close, but we both have high standards and getting married in Switzerland this year really cost a bundle.. So what to do about wedding rings?
Solution: Make them myself!
My normal M.O. is to research extensively, design and then prototype and only then make the final product, well this time was no different, sure I'd made jewelry in the past but this was a huge step up, I mean I'm working with materials I can't afford to replace if I mess up!
An added complication was I had a fairly tight time frame plus the fact that I needed to school myself on some techniques I'd never used before, namely inlaying precious metal and setting gems. Needless to say, it was nervous work. I spent a month or so coming up with designs and honing them down to something do-able, then buying Ballas diamonds, Mokume Gane and Titanium, not to mention a few special tools.

Then I got to work cutting the ring blanks:
 Cutting the main features on a CNC mill:
Fitting the Mokume-Gane inlays:
Assembled components:
After all that, I finished them off with lots of sanding, acid etching and polishing. It was something close to 40hrs of cutting and finishing, which really gives me a new appreciation for custom made jewelry, I thought Mokune-Gane rings seemed over priced before but now they seem like a bargain!
Link to more photos and video--> OUR CUSTOM RINGS 

Friday, August 19, 2011

Cushman Head

I just finished machined aluminum Cushman cylinder head for Groff Machine.
Made from Mic6 cast tooling plate for it's dimensional stability and low inherent stresses, it also has a relocated spark plug position, 14mmx1.25 plug threads, increased cooling fin area and a revised combustion chamber shape to accommodate larger valves and cylinder bore. 

I used a long .125"dia. ball-end mill with a lot of patience to get the fins cut, run time on the fin side was at least 6hrs. Despite the blocky appearance, there is a whole lot of free-form machining but it turned out well, cant wait to see it at home on an engine now. Just for kicks, I made an RP 1:3rd scale model for posterity using and Objet Eden 260v.
More Projects Coming!

Saturday, May 7, 2011

Slow and steady progress

I've been working on what seems like 10 concurrent projects the last few months, trying not to neglect any one project, consequently I've only gone so far with each but whatev.. It's progress!

As far as the Jackhammer Scooter goes, I finally bought the front fork tubing and had it bent, I gotta' say there is a HUGE difference in price between .062" wall welded SS tube and .083" wall Seamless tube, Yowza.
I bought replacements for wrecked parts like a tire, wheel, bearings, ect. so I'm hoping to have a rolling chassis again fairly soon

Made a few bits for Speed Shop Design, which pretty damn cool to do I must say, And totally gratifying knowing that someone else with real skills trusts me enough to make something.

I really like my day job too, I just can't talk about it or show cool pics of parts or I'll be fired, jailed or worse hehe.. But here is a Sketchup version of my work environment: Something I just recently started playing around with and like A LOT.
I've recently committed myself to designing a high-flow, super$$$ race fuel petcock for the Vespa P. Silly I know, But I NEED it. No more leaning-out at WOT. All other mitigating solutions are null and void now(I'm looking at you "float bowl spacer" and SIP fuel valve!)

And lastly, work continues on the supercharger as well as my plan to redo the P.

Sunday, November 28, 2010

Super Scooter

So I finally got around to taking apart the so-called "Jackhammer", It's been on the back burner for way too long now. About April 08' I wrecked it and it's been non-functional since. I never really finished this scoot, I got it running for a rally and kept on riding it, after all, why take apart a decent runner? But every time I looked at the thing, I'd think about how much more I'd like to do to it. Well, now's the time.
 Fortunately, I started rehabbing some of the front-end parts well before the move to Seattle. So the rebuild will mainly consist of:
1. Making composite bodywork
2. Minor Frame repair and powder coating
3. Remaking the front fork tubes, rear hub, handlebars, ect..
4. Buying any needed parts
5. Reassembly
So, Here it is torn down to the frame, first time since April 05'
  
So, First order of business is to start mocking up the bodywork and seating, stay tuned!


Wednesday, June 23, 2010

Vespa Learnin'

It was about that time, time to do something about that nagging problem of slipping out of gear. Anyone owning an older Vespa knows what I'm talkin' about... The shift-cross syndrome! Many a vintage owner has had to endure the gradually increasing frequency of sloppy and erratic gear changes up until the point that the bike is darn near unrideable, then and only then, biting the bullet to change out that small but oh-so-important piece of metal.
And this is an image of the "depth of disassembly" usually required to rectify that nagging little problem.
Really though, it's not that big of a deal except for the fact that you are certain to find all manner of other little things that need fixing, little things that make you wonder how this scooter lasted as long as it did... Furthermore, my penchant for "over doing it" had me improving and tweaking every last little detail as it were, turning a weekend project into a 2 week ordeal.

So here's some of the things I've done:
custom grind output shaft spacers, lapped head and cylinder mating surfaces, port matched carb and case, replace all "tiny bits", cleaned EVERYTHING, lightened flywheel, new points and condenser, all new gaskets, replaced cables. Also replaced tank cap gasket, front shock bolt, tightened seat spring, installed step-thru channel rubber mat, custom made front suspension cover, blah, blah, blah.. I'm leaving so much out here.
And after all that, getting this bike in good running condition, standing back and feeling very smug about it all, I decided to take it off the stand and guess what? The front tire slips off the ramp and bonks the front fender! Ugh, nothing is ever PERFECT.

btw, thanks Scooterworks for having everything I needed in stock. You care for my needs.